General information
Top panel of tools
Bottom panel of tools
Hello Friends,
We’re glad to meet you at this page. Here you can find detailed tutorial for the use of Total File Commander Pro!
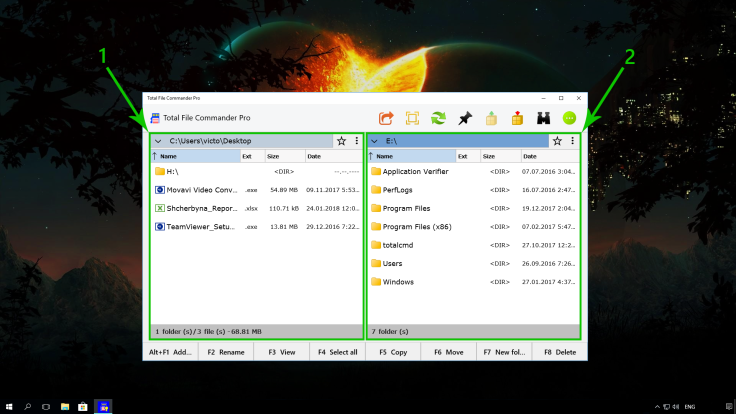
First of all, launch the application, and select the disk to work with.
Please note: you need to choose the drive (and not the folder) and then you’ll have access to all folders.
This can be done with “Add Drive” button or simply click at Alt + F1.
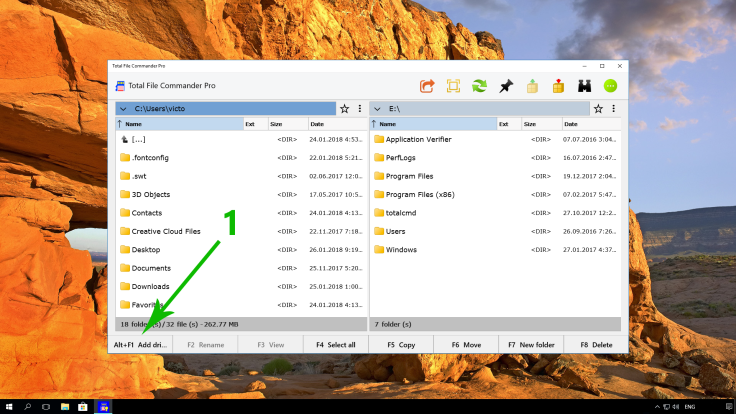
Pic 1 – Button “Add Drive”
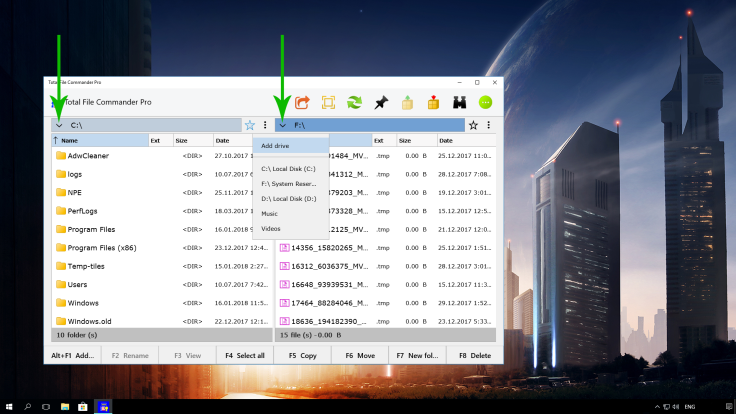
To open a disk on the right side of the app, or, for example, to replace already opened one in the left pane, just double-click the button with the address bar. This is how you can open the Folder Picker.
Pic 2 – Selected button with an address bar that allows you to change directory/disk in the corresponding window
Here is also a feature to view the history of opened folders.
Pic 3 – With this button, you can view the history of opened folders
You can add a folder to your “Favorites” to quickly access it.
To do this, you need to select any folder (move to it), click on the “Star”. After that, the folder that you’ve added appears in the “Show Favorite”.
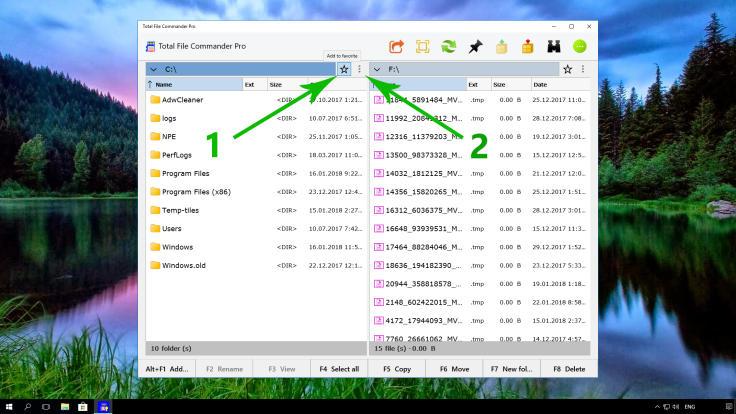
Pic 4 – The button “Favorite” and drop-down list “Show Favorite”
Please note: while working with the application, you are not working with all the windows at once. You work only with one active window.
How to define which window is active? The active window has a dark blue address bar color.
Pic 5 – Windows borders:
1 – left window is an active window, 2 – right window is an inactive window
Hotkeys and arrows work with an active window.
You can move between windows with the “TAB” key or by clicking the mouse within a single window.
By clicking on the “More” button, you’ll find the following: “Settings”, “Shortcuts”, “Commands of Cortana”, “About”.

Pic 6 – “More” button
In the “Settings” you can change the language of the application, and enable Windows Hello feature.
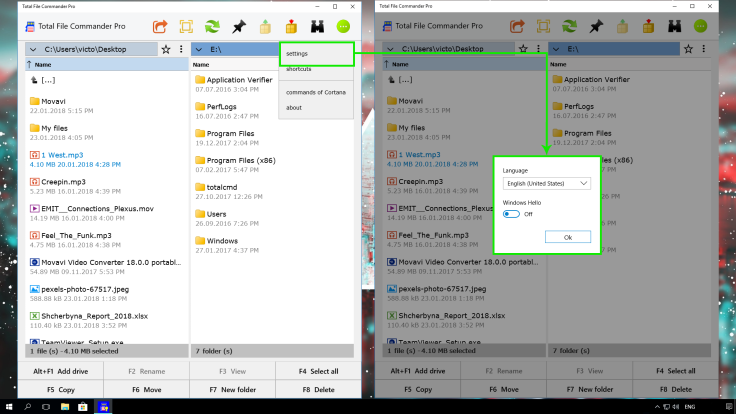
Pic 7 – Settings window
Clicking on the “Shortcuts” button, you’ll see the list of combinations that can be used in the application.
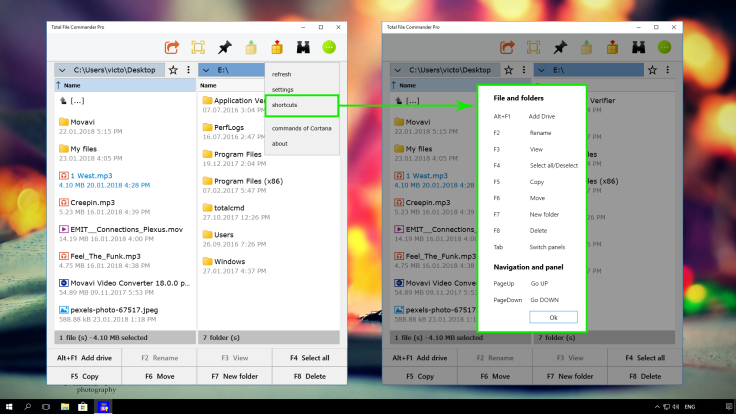
Pic 8 – Hotkeys
Clicking on the “Commands of Cortana”, you’ll see the list of voice commands which you can manage the app with.
Please note, which regions and languages are supported for Cortana voice commands.
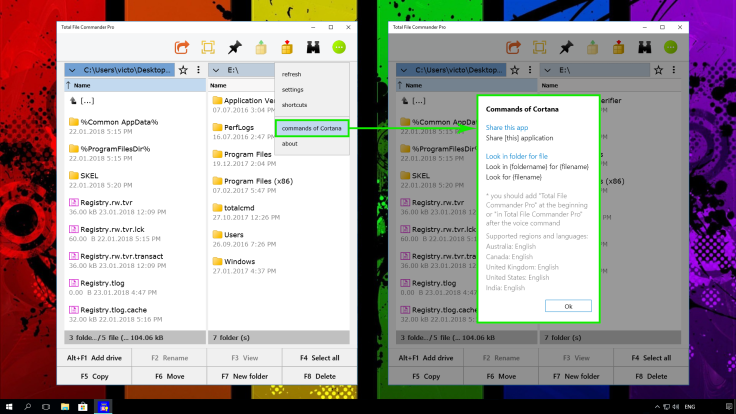
Pic 9 – Commands of Cortana
In the “About” section, you can find information about the current version of the app, publisher’s name, short app’s description and also head to the Store page, where you can explore another our applications.
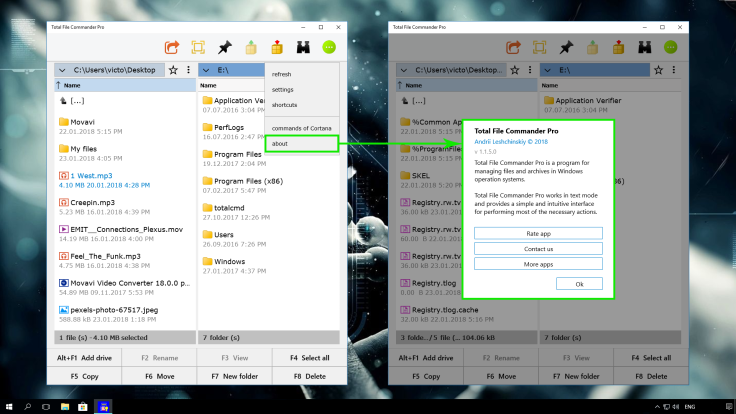
Pic 10 – About the application
We are always aiming to deliver you the best experience with our App. Hope this tutorial was really helpful and you using the app with pleasure.
You can also email us via another mail services by this email –> contact.neonband@gmail.com
Support team is always to your service!
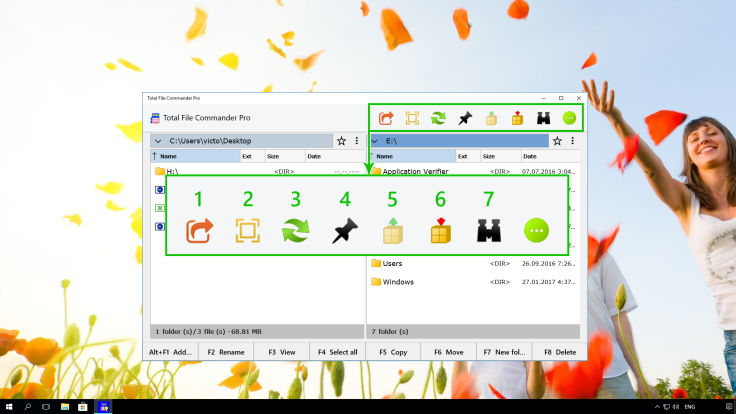
Pic 1 – Tools of the top panel
1. “Share”
You can share the link on application with your friends.
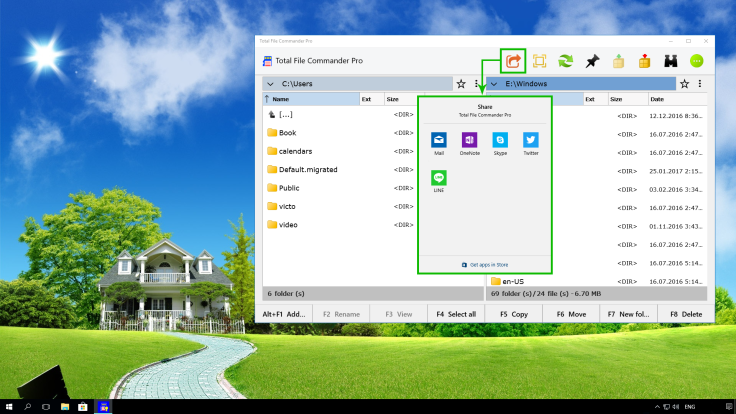
Pic 2 – ”Share”
2. “Inking”
You can use Ink tool for drawing out important information, take a screenshot of your notes, and share it with others.
Pic 3 – “Inking”
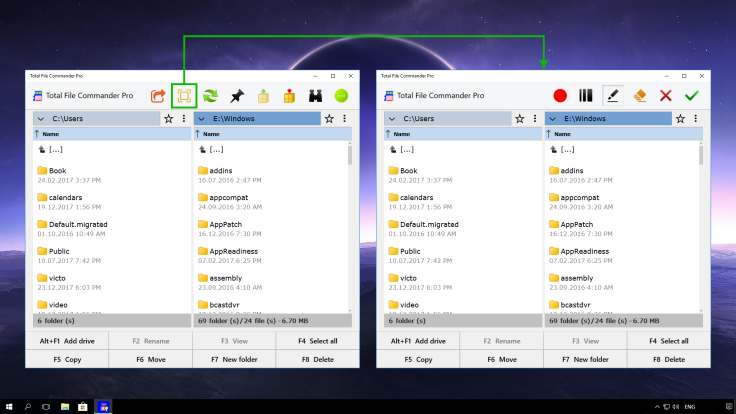
3. “Refresh”
With this button, you can update the list of files that have been added or create new with other application.
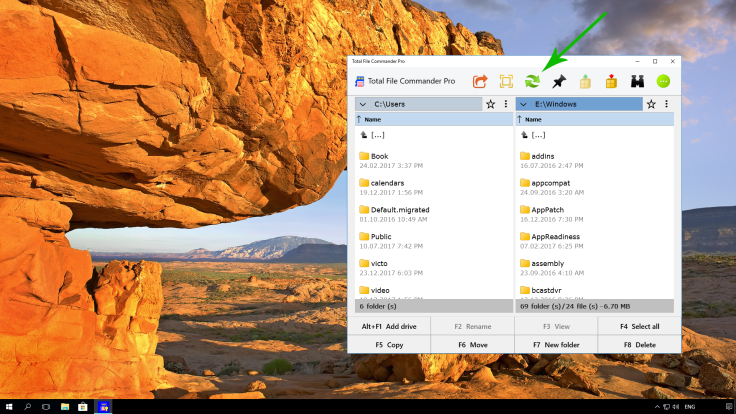
Pic 4 – “Refresh”
4. “Pin”
Here you can Pin the folder to your Windows 10 Start Screen. Please note: you’ll pin the folder of the active window.
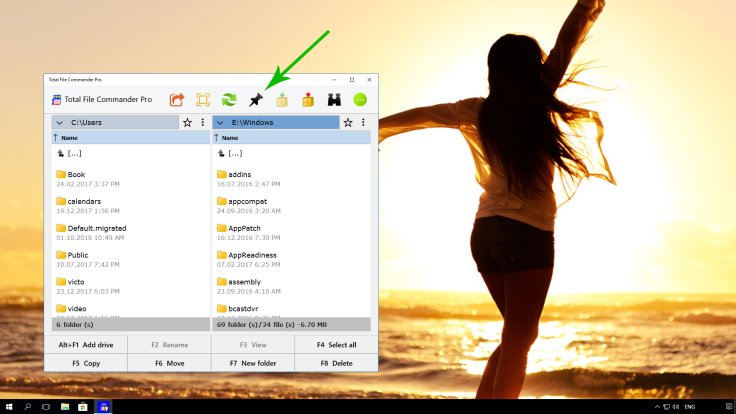
Pic 5 – “Pin”
5. “Unpack files”
To unpack a file archive, just select the file with the right mouse button and click the “Unpack files” button.
In the “Output folder” field, choose the desired folder to save the files from the archive.
Pic 6 – Unpack files
6. “Pack files”
There is also the possibility of file archiving.
In the “Output folder” field, select the folder where you want to save the archive.
In the “File name” field, specify the desired archive name.
In the “Format” field, select one of the 12 supported archiving formats.
Pic 7 – Pack files
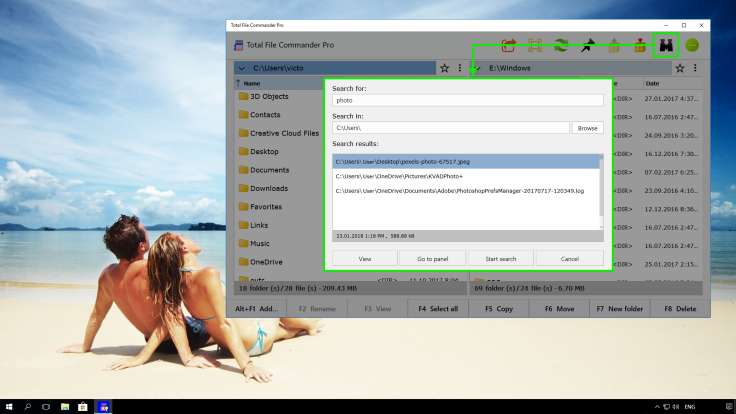
7. “Search”
With the help of “Search”, you can find files and folders on your disks.
Pic 8 – “Search for”
In the “Search for” field, enter the name of the file you’re searching for.
In the “Browse” field, select the directory/drive where to search in.
Then click on the “Start Search” button.
Once you receive the search results, there is an opportunity to get the detailed information about the selected file/folder (file size and date of its latest editing).
With the “View” button you can immediately see the content of the selected file.
The “Go to panel” button opens the selected folder in the active window.

Pic 9 – “Go to panel” button
Pic 1 – Tools of the Bottom panel & hotkeys
In the bottom panel of the app, you can find tools that help to manage your files and folders: “Rename”, “View”, “Select All”, “Copy”, “Move”, “New Folder”, “Delete”.
If the buttons are not active – select (press) the desired file/files.
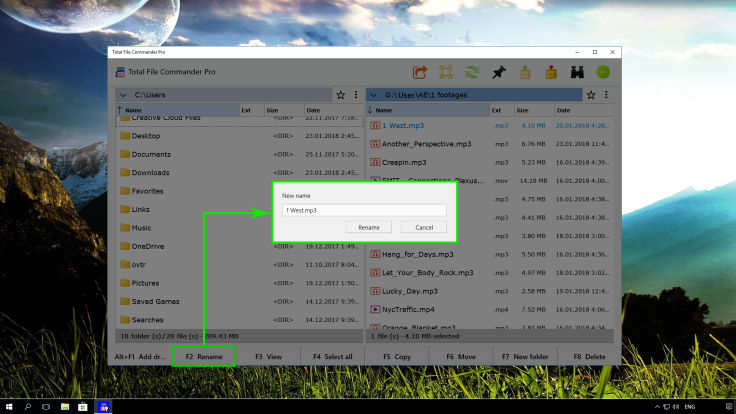
F2 “Rename”
Select file or folder then click on this button and rename the file or folder.
Pic 2 – “Rename”
F3 “View”
With this button, you can view the file.
You can also view the file by clicking on the file with the left mouse button.
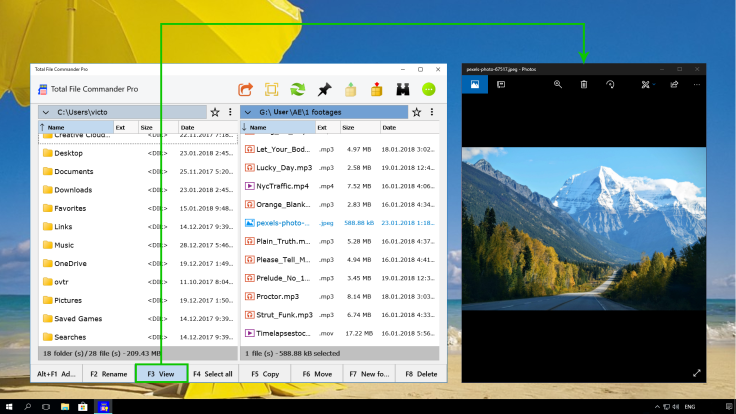
Pic 3 – “View”
F4 “Select all” / “Deselect”
Here is also a possibility to select all files and folders that are in the active window (with just a one click).
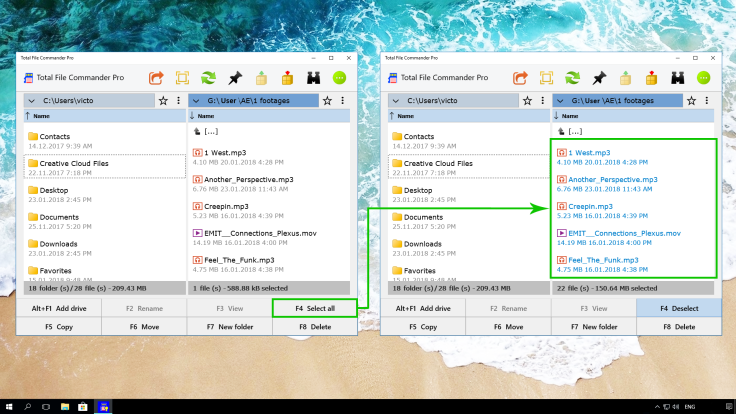
Рис 4 – “<Select all”> / “Deselect”
With the “Deselect” button, you can deselect all items in the active window.
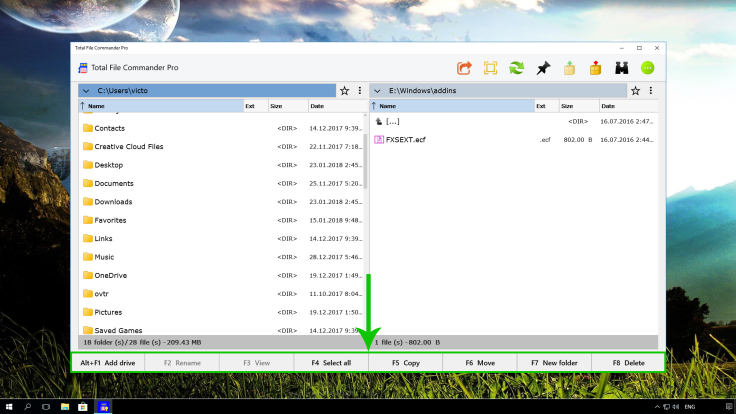
F5 “Copy”
The button for copying files and folders. It copies the selected items (folders/files) from the active window to the inactive. You can select items by right-clicking on them.
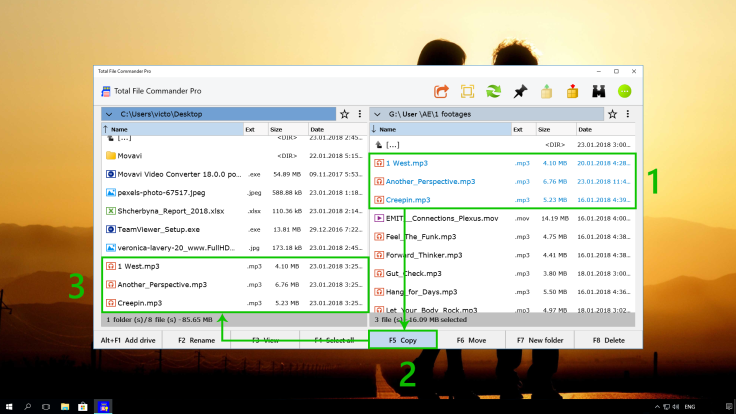
Pic 5 – The files after copying are available in both windows
F6 “Move”
You can move files and folders from the active window to inactive (the same as by the feature “Cut” / “Paste”).

Pic 6 – “Move”
F7 “New Folder”
Here you can create a new folder.
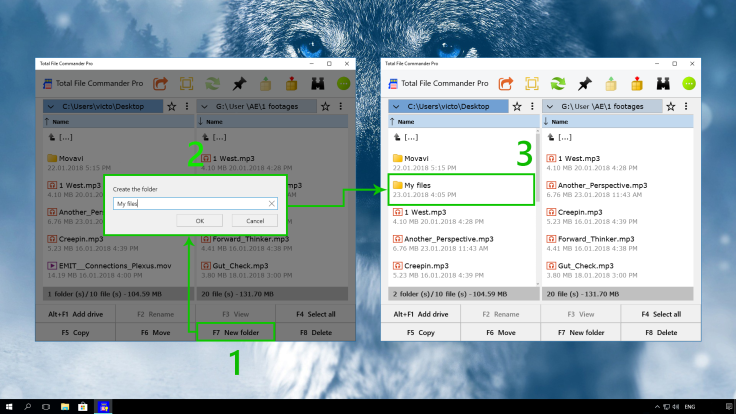
Pic 7 – “New Folder”
F8 “Delete”
This button allows you to delete items that are selected with the right click mouse.
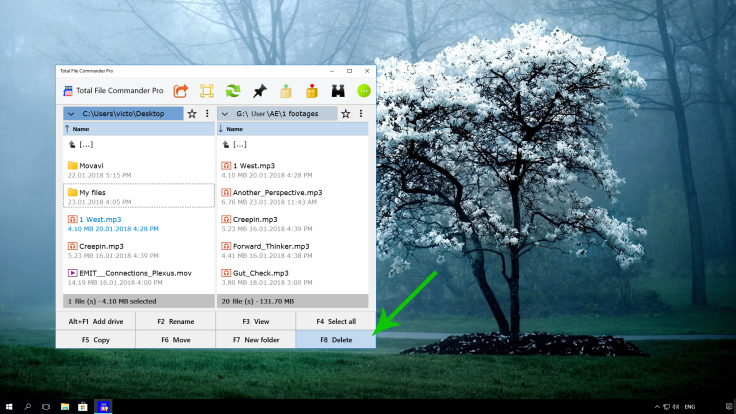
Pic 8 – “Delete”
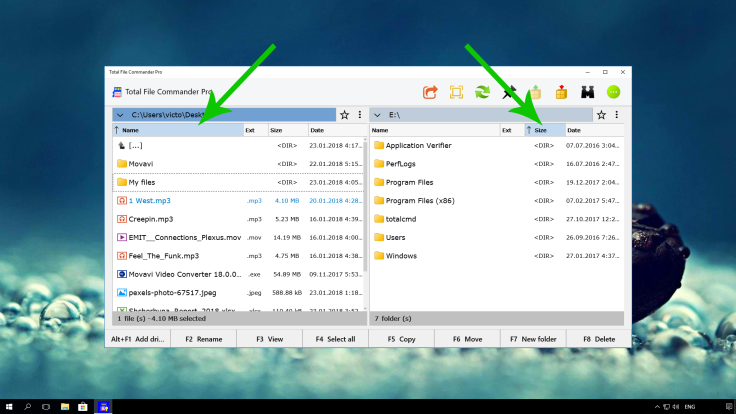
When the app’s window is opened more than half-screen, it is possible to view additional file info and sort by existing parameters (Name, Ext, Size, Date).

Pic 9 – Additional information about folders and files, and sort feature by one of the (ascending/ descending) parameters.
